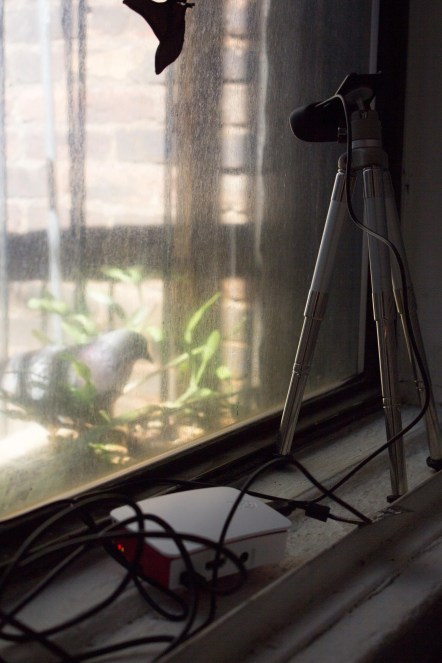
Much to my delight, I discovered that a pair of pigeons are nesting outside of my window. I decided to set up a live streaming webcam so I can watch the young pigeons hatch without disturbing the family. Instead of buying an off-the-shelf streaming solution, I used a Raspberry Pi and a USB webcam. Here is how I set up live streaming video using my Pi and Ustream.
For this project, I used a Raspberry Pi Model B+, a USB WiFi adapter, a microSD card, a USB webcam and a 5 volt power adapter. When selecting a USB webcam, try to get something on the list of USB webcams known to work with Raspberry Pi. It will save you a lot of headaches in the long run!

To start, download the latest Raspbian image and load it onto the SD card. My favorite tool for doing this on a Mac is Pi Filler. It’s no-frills, easy to use and free! It may help to connect the Pi to a monitor and keyboard when first setting it up. Once the Pi first comes up, you will be prompted to set it up using raspi-config. At this time, it’s a good idea to expand the image to use the full card space and set the internationalization options to your locale so that your keyboard works properly.
Once the Raspberry Pi boots up, there are a few things that need to be updated and installed. First, it’s a good idea to update the Raspbian image with the latest software. I also like to install webcam software, fswebcam, so I can test that the webcam works before setting up video streaming. Finally, you’ll need ffmpeg, which is software capable of streaming video. The following commands will set up the Raspberry Pi:
sudo apt-get update
sudo apt-get upgrade
sudo apt-get install fswebcam
sudo apt-get install ffmpeg
After installing the software, it’s a good idea to check whether the webcam works with the Raspberry Pi. To do this, simply take a picture with the webcam using fswebcam. This will attempt to take a single photo from the webcam. You can do this by running the following command:
fswebcam photo.jpg
If the photo looks good, then you are ready to set up streaming video. First, set up a Ustream account. I set up a free account which works well despite all of the ads. Once you set up your video channel, you will need the RTMP URL and stream key for the channel. These can be found in Dashboard > Channel > Broadcast Settings > Encoder Settings.
Next, set up video streaming on the Raspberry Pi. To do this, I used avconv. The documentation for avconv is very dense and there are tons of options to read through. I found this blog post which helped me get started. I then made some adjustments, such as using full resolution video, adjusting the frame rate to 10 frames per second to help with buffering issues and setting the log level to quiet as to not fill the SD card with logs. I also disabled audio recording so I wouldn’t stream the laments of my cat for not being allowed to ogle the pigeons. I wrote this control script for my streaming service:
#!/bin/bash

case "$1" in
   start)
      echo "Starting ustream"
      avconv -f video4linux2 -r 10 -i /dev/video0 - pix_fmt yuv420p -r 10 -f flv -an -loglevel quiet <YOUR RTMP URL>/<YOUR STREAM KEY> &
      ;;
   stop)
      echo "Stopping ustream"
      killall avconv
      ;;
   *)
      echo "Usage: ustream [start|stop]"
      exit 1
      ;;
esac

exit 0
Make sure the permissions of your control script are set to executable. You can then use the script to start and stop your streaming service. Before placing the webcam, it’s a good idea to see if you need to make any additional updates to the Raspberry Pi for your webcam to work. The webcam I chose, a Logitech C270, also required some modprobe commands to keep from freezing. Finally, it’s a good idea to add your control script to /etc/rc.local so that the streaming service automatically starts in case your Raspberry Pi accidentally gets rebooted.
And that’s it! There is a multiple second delay to the streaming service so within a minute you should see live streaming video on Ustream. One word of caution on working with the Raspberry Pi: be sure to shut down the Raspbian operating system before unplugging the Raspberry Pi. The SD card can become corrupted by just unplugging it. This will cause the operating system to go into kernel panic and refuse to boot. Sadly, the only solution for this is to reinstall Raspbian and start all over again.
Once my webcam was up, I found that I had some issues positioning the camera effectively. To solve this, I bought a cheap mini camera tripod. I then dismantled the clip of my webcam and drilled a 1/4″ hole in the plastic so it would fit on the tripod. I put a 1/4″-20 nut on the top of the screw and I was good to go!
I will be live streaming the pigeon nest for the next month or so on this Ustream channel (Update: the baby pigeons have grown up and left the nest, so pigeon cam has been taken down). I’ve learned a lot about pigeons by watching them every day. The squabs should hatch during the upcoming week and I am excited to watch them grow!


